Step 1:

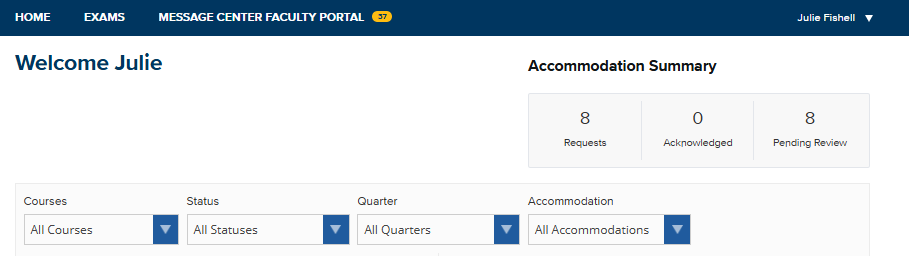
Locate the dark blue bar at the very top of your screen. This bar remains constant as you navigate through the portal, allowing you to switch between viewing student accommodation requests and managing your exams.

Click on the EXAMS tab located between "HOME" and "MESSAGE CENTER."
 

Image
A screenshot of the main faculty portal dashboard titled "Welcome Julie." The navigation bar at the top of the page features several tabs: "HOME," "EXAMS," and "MESSAGE CENTER FACULTY PORTAL." The rest of the page displays an accommodation summary and a table of student requests currently pending review.

Step 2:

A list of courses for which you are the instructor will appear.

Click the pencil icon under the Edit/Add Exam Info column for the appropriate course.

Image
A screenshot of the "Exam Information" section within a faculty portal dashboard. A table lists specific courses alongside columns for the number of exams scheduled and their current status. An orange arrow points to a "Pencil and Paper" icon under the "Action" column, indicating the step to add or edit exam details for a course.


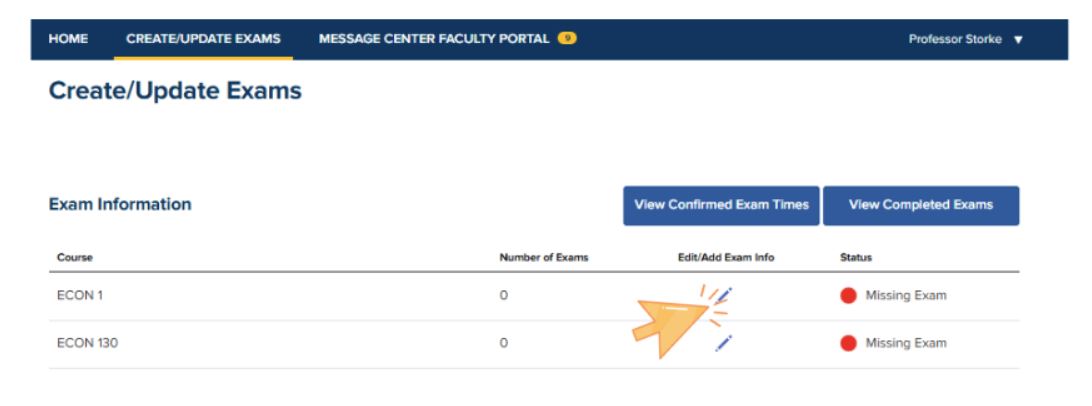
(Visual Aide: An orange arrow points to a "Pencil and Paper" icon under the "Action" column, indicating the step to add or edit exam details for a course.)
 

Step 3:

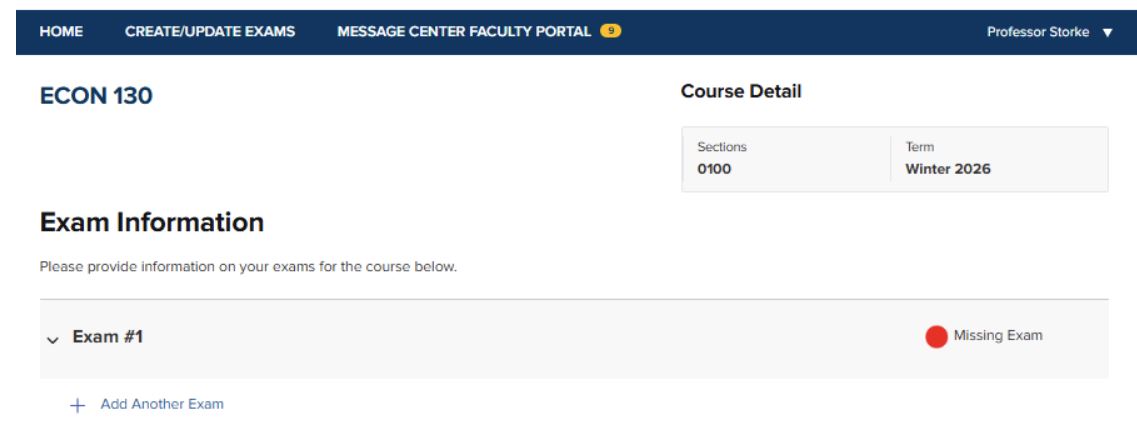
Click Add Another Exam.
 

Image
A screenshot of the "Exam Information" input screen for a specific course. The page displays course details such as section and term. An orange arrow cursor points to a text link labeled "Add Another Exam" preceded by a plus symbol, indicating the action required to begin entering specific testing dates and times.


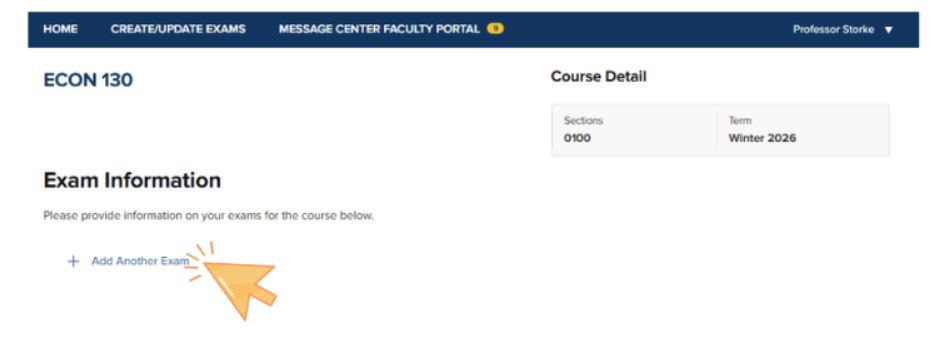
(Visual Aide: An orange arrow cursor points to a text link labeled "Add Another Exam" preceded by a plus symbol, indicating the action required to begin entering specific testing dates and times.)
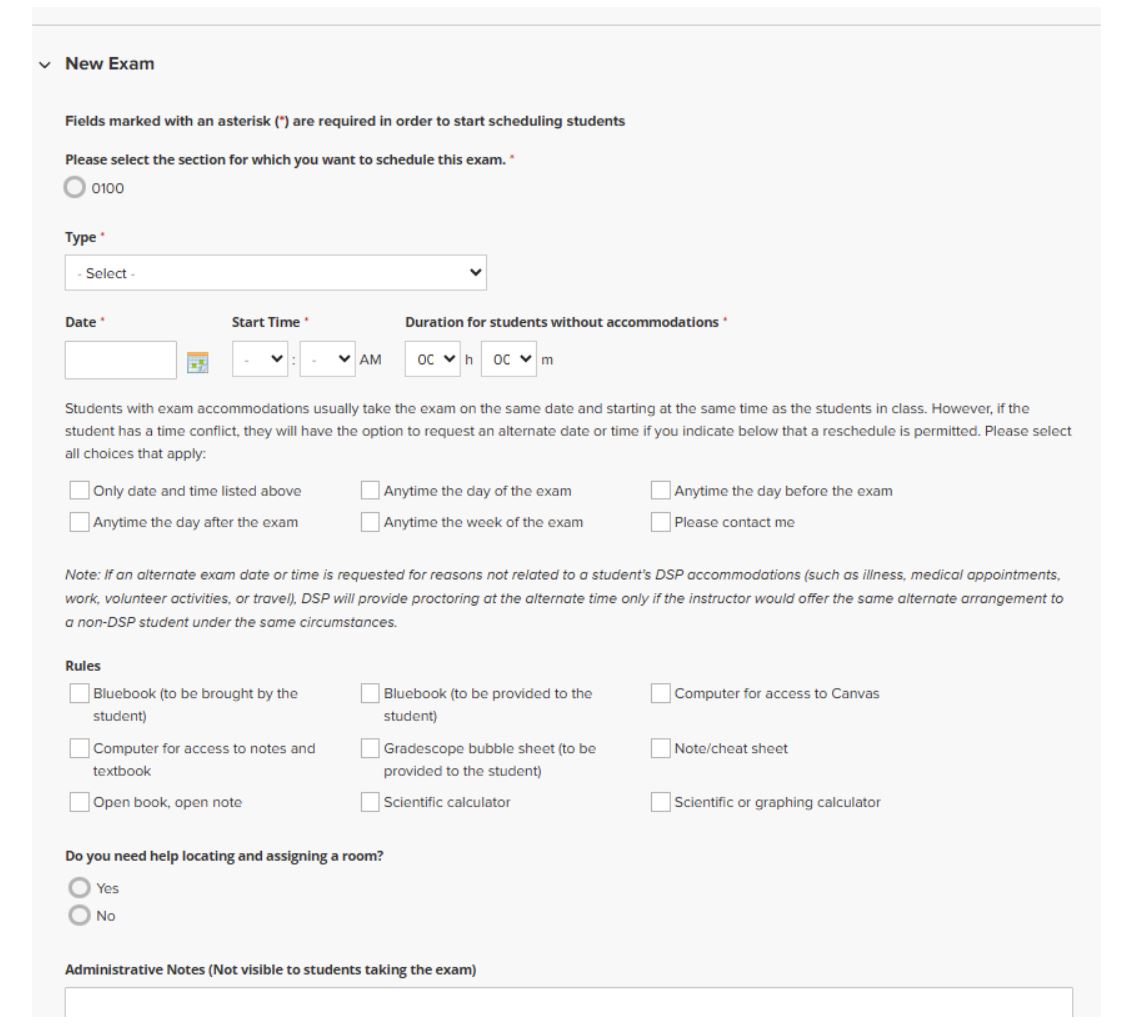
 

Step 4:

Complete all requested exam information.

The details you provide allow DSP and the Academic Testing Center to:

  • Coordinate proctors and testing rooms
  • Ensure an equitable testing environment
  • Confirm that proctors follow your classroom policies and practices
  • Create a smooth exam experience for both students and faculty

If you have questions while completing the form, please contact the Test Proctor Coordinator at testproctor@sa.ucsb.edu.
 

Image
A detailed "New Exam" form in a faculty portal, displaying various input fields for scheduling. It includes sections for selecting the course section, exam type, date, and start time. Specific input areas allow instructors to define the exam duration for students without accommodations, set rules for reschedule windows, and select permitted materials such as calculators or bluebooks.


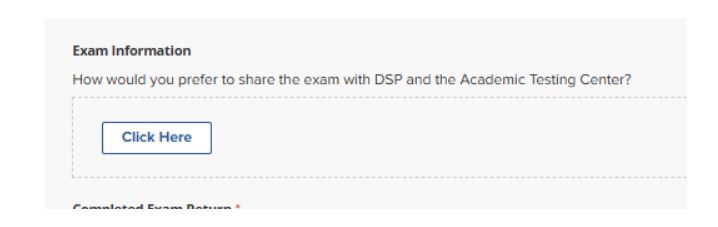
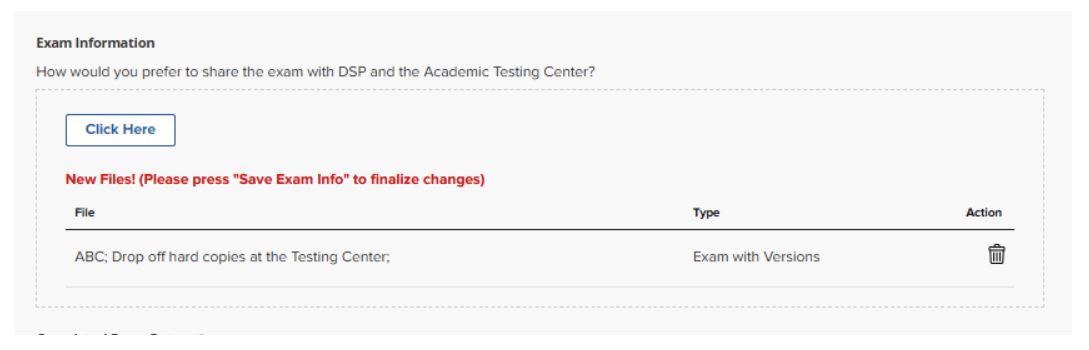
Sharing the Exam with DSP and the Academic Testing Center

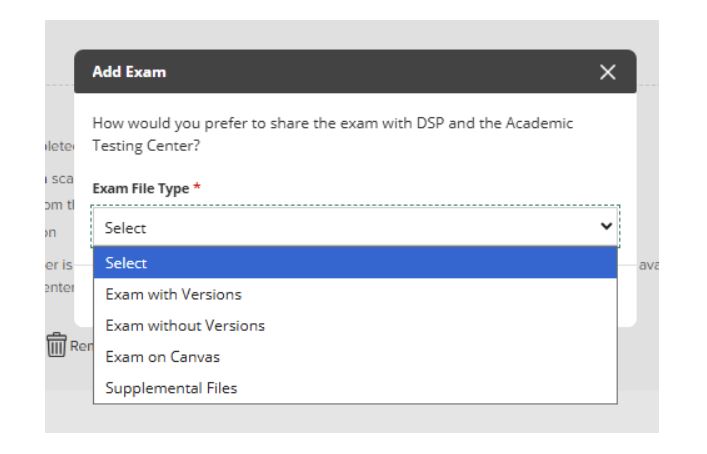
Under “Exam Information – How would you prefer to share the exam with DSP and the Academic Testing Center?”, click the blue Click Here button.
 

Image
A screenshot of the "Exam Information" section within an exam setup form. It asks, "How would you prefer to share the exam with DSP and the Academic Testing Center?" followed by a blue-bordered button labeled "Click Here" inside a dashed-line container.


You will be asked to select the exam type:

  • Paper Exam (with or without multiple versions)
  • Canvas Exam
  • Supplemental Files


Image
An "Add Exam" pop-up window in a faculty portal that asks, "How would you prefer to share the exam with DSP and the Academic Testing Center?" A dropdown menu labeled "Exam File Type" is open, revealing options including "Exam with Versions," "Exam without Versions," "Exam on Canvas," and "Supplemental Files."


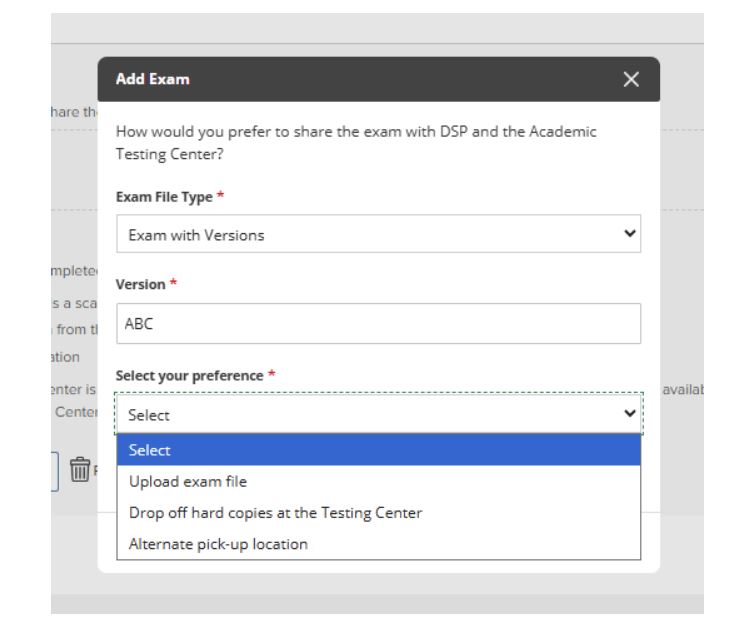
For Paper-Based Exams

You may choose one of the following options:

  • Upload the exam file to be printed at the Testing Center (preferred)
  • Drop off hard copies at the Testing Center
  • Set an alternate on-campus pick-up location for the proctor

If you select an alternate pick-up location, you must provide a pick-up time approximately 15–30 minutes before the exam begins. DSP does not allow proctors to hold exams for longer than 30 minutes. If you are not available for pickup in that time frame, please consider sharing the exam file or hard copies with the Testing Center.
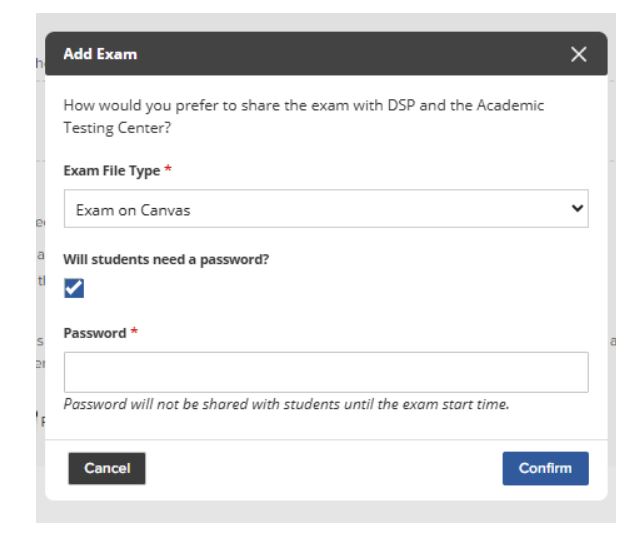
 

Image
An "Add Exam" pop-up window in a faculty portal with three required fields marked by red asterisks. The form includes a dropdown for "Exam File Type", a text box for "Version", and an open dropdown menu for "Select your preference" displaying options: "Upload exam file," "Drop off hard copies at the Testing Center," and "Alternate pick-up location."


For Canvas Exams

You may enter a password that will be visible to the proctor but not to students. The proctor will provide the password at the exam start time, consistent with your classroom procedures.

If you are a faculty member who would like to discuss computer-based exams administered through the Academic Testing Center, please contact Linda Adler-Kassner at ladler@ucsb.edu.
 

Image
An "Add Exam" pop-up window in a faculty portal specifically for digital assessments. The "Exam File Type" dropdown is set to "Exam on Canvas." A checkbox is selected for the question "Will students need a password?" which has revealed a mandatory "Password" text field marked with a red asterisk. At the bottom, there are "Cancel" and "Confirm" buttons.


Your selection, including notes, appears below the Click Here button.
 

Image
A screenshot of the "Exam Information" section within a faculty portal, showing the final confirmation of delivery preferences. Below a "Click Here" button, a red text notification reads: "New Files! (Please press 'Save Exam Info' to finalize changes)." A summary table shows the selected method. A trash can icon in the "Action" column allows for the removal of these selections if a correction is needed.


Important: “Missing Exam” Status

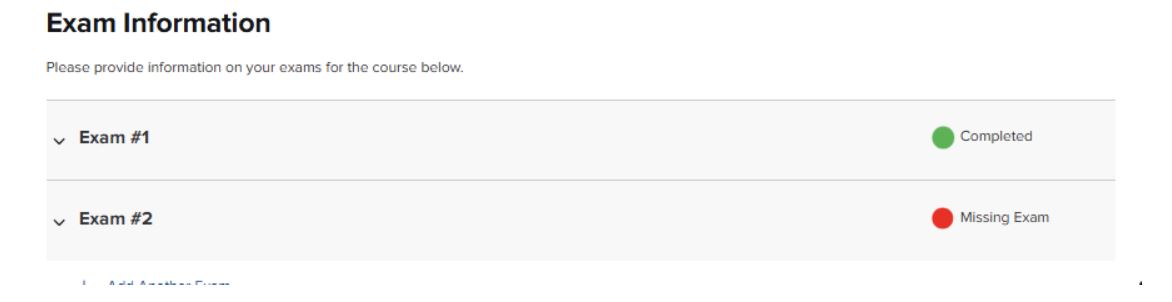
You are not required to select a sharing method immediately. For example, you may plan to upload a digital file but have not yet finalized the exam. If no exam delivery method is selected, the status will show “Missing Exam” with a red dot to remind you to complete this step at a later time.
 

Image
A screenshot of the "Exam Information" page for a specific course. A collapsible section titled "Exam #1" is visible, displaying a red circle icon and the status "Missing Exam," indicating that detailed information for this specific test has not yet been provided.


Once you select a delivery method and/or upload the file, the status will update to “Completed” with a green dot.
 

Image
A screenshot of the "Exam Information" status dashboard for a course. Two individual exam entries are listed: "Exam #1" displays a green circle icon and a status of "Completed," while "Exam #2" displays a red circle icon and a status of "Missing Exam." This visual contrast highlights which assessments have been fully configured and which still require instructor input.


Editing an Exam

To edit an exam:

  1. Return to the Exams tab.
  2. Click on the exam you wish to edit.

You may continue to modify any details that do not affect proctor or room scheduling. Changes to exam duration or exam start time must be communicated directly to DSP at testproctor@sa.ucsb.edu so that proctor and room reservations can be adjusted accordingly.

How Students Confirm Exam Times

Once an exam is posted, meaning you have completed the steps above, students must confirm their exam time to indicate they will be taking the exam with DSP accommodations. For more information on this process, visit our how-to guide for students: Schedule an Exam.
 

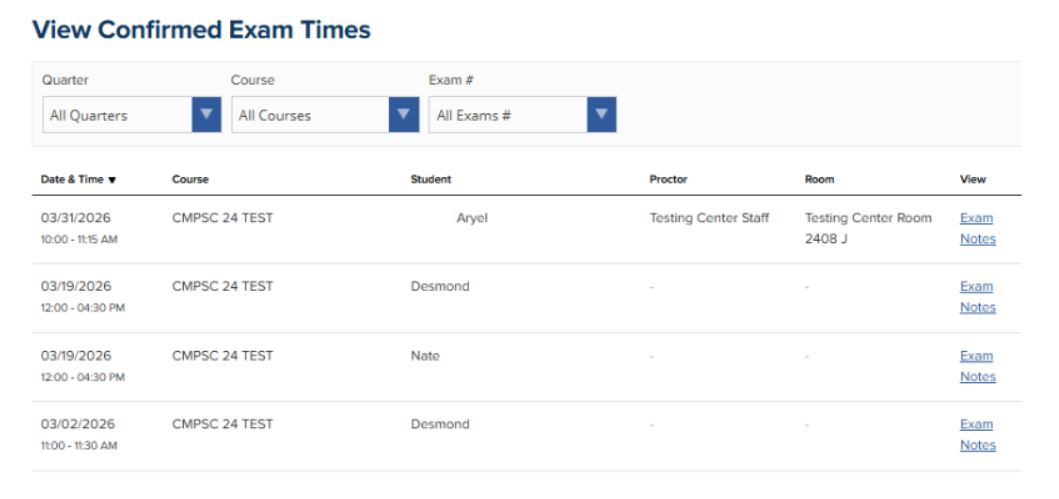
Viewing Confirmed Exam Times

Step 1:

Under the Exams tab, click the blue View Confirmed Exam Times button.

Image
A screenshot of the Exam Information dashboard within the Exams tab. At the top right of the data table, three prominent blue navigation buttons are displayed in a horizontal row: Alt. Time Requests, View Confirmed Exam Times, and View Completed Exams. These buttons serve as the primary control center for switching between managing student scheduling conflicts, reviewing finalized proctoring appointments, and accessing historical exam data.

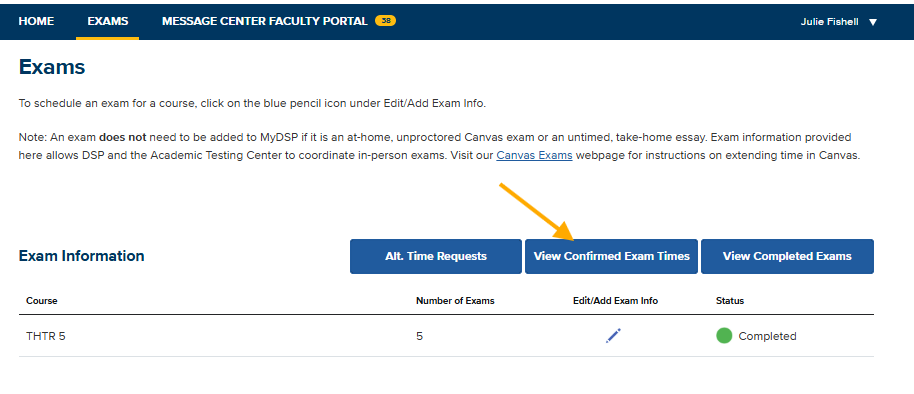
(Visual Aide: An orange arrow points to a blue button with white text reading "View Confirmed Exam Times" which is between two other buttons reading "Alt Time Requests" and "View Completed Exams")

You will see an overview that includes:

  • Exam date and time
  • Course
  • Student name
  • Proctor
  • Room

If proctor or room information is blank, scheduling is still in progress.
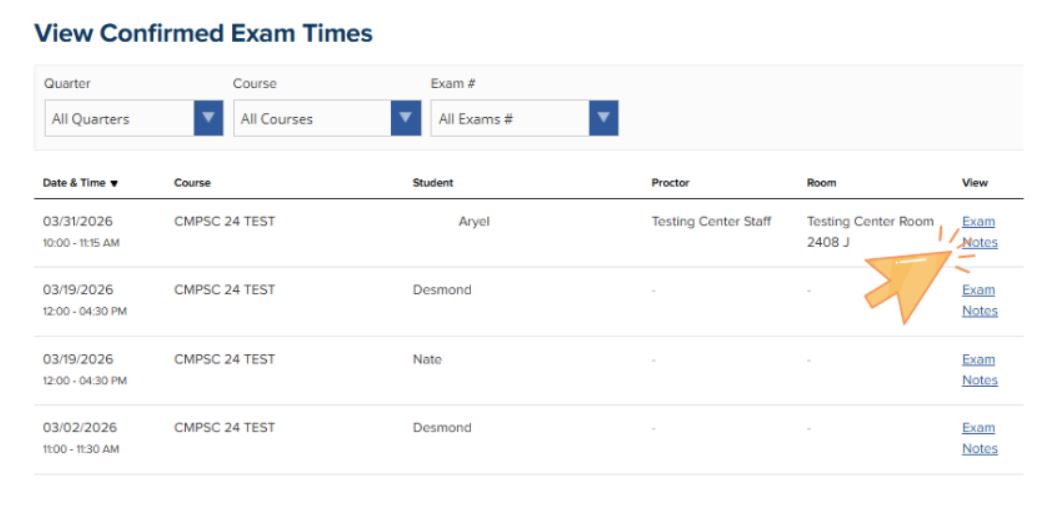
 

Image
A screenshot of the "View Confirmed Exam Times" page in the faculty portal. This page features a data table listing finalized proctoring appointments for students. Columns include the Date & Time (showing specific exam windows), Course name, Student name, assigned Proctor (e.g., Testing Center Staff), Room location, and a "View" link for Exam Notes. At the top, dropdown filters allow the instructor to sort by Quarter, Course, and Exam number.


Step 2

In the far-right column labeled View, click Exam Notes to access detailed information, including:

  • The information you entered on the Create/Edit an Exam page
  • Each student’s accommodations
  • Proctor notes
     
Image
A screenshot of the "View Confirmed Exam Times" table. An orange arrow points specifically to the "Exam Notes" link on the far right of a student's record row.


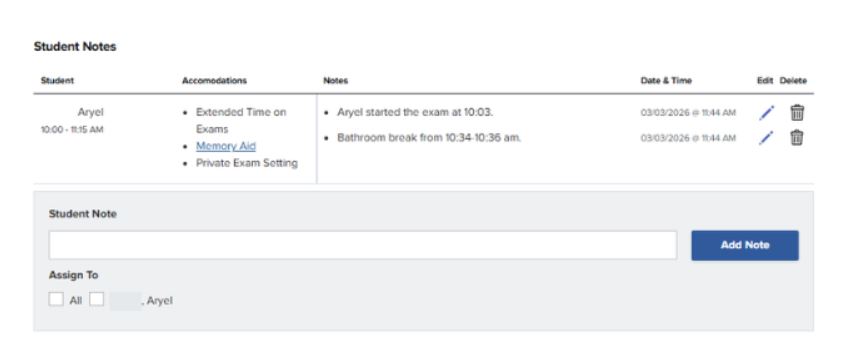
Understanding Exam Notes

There are two types of notes:

General Notes

These apply to the exam as a whole (e.g., “Exams were returned to the listed drop-off location at 11:24 am.").

Student-Specific Notes

These apply to individual students.

Proctors may:

  • Apply the same note to all students (e.g., “All students began the exam at 10:00 a.m.”), or
  • Add notes for individual students (e.g., “Aryel took a bathroom break from 10:34 to 10:36 a.m.")
     
Image
A screenshot of the Student Notes interface within the faculty portal. The page features a summary table for a specific student, listing their scheduled exam time, specific accommodations (such as Extended Time and Memory Aid), and chronological proctoring notes (e.g., exam start time and bathroom breaks). Below the table, an Add Note section allows instructors to type and assign new comments to the student's record.


Important Reminder

If you need to update instructions for all students (e.g., permitted materials or exam directions), please return to the Exam Information under  the Exams tab to make edits there.
 

Image
A detailed "New Exam" form in a faculty portal, displaying various input fields for scheduling. It includes sections for selecting the course section, exam type, date, and start time. Specific input areas allow instructors to define the exam duration for students without accommodations, set rules for reschedule windows, and select permitted materials such as calculators or bluebooks.


Adding notes to the Exam Notes page may create confusion if the new guidance conflicts with the original exam information, and editing the Exam Information ensures all students and proctors receive the same updated information.
 

Reviewing Requests for Alternate Times

To see students who have requested to take the exam at a different time than the standard class time, faculty can click the 'Alt. Time Request' button to review and approve new times for these individual requests.

Image
A screenshot of the Exam Information dashboard in the faculty portal. The interface displays a table for the course, showing it has 5 exams listed with a green circle and Completed status. An orange arrow points specifically to the first of three blue navigation buttons: Alt. Time Requests, which sits alongside View Confirmed Exam Times and View Completed Exams.


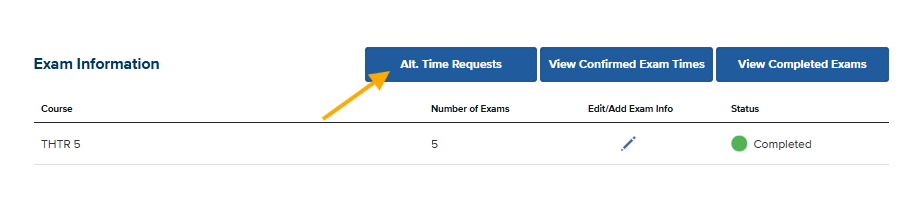
(Visual Aide: An orange arrow points to a blue button with "Alt Times Request" written in white inside of it, to the left of a button that says "View Confirmed Exam Times.")

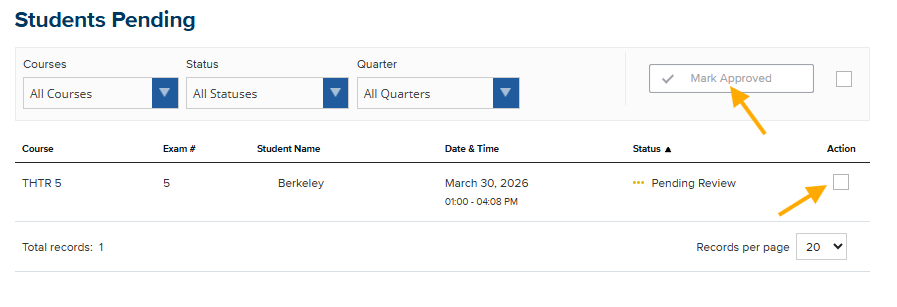
Approving Alt. Time Requests

To approve the request, select the checkbox in the Action column for the specific student. Once the checkbox is marked, click the Mark Approved button. This new time will now be reflected for you and the selected student. If you have any questions or concerns about the request, please email testproctor@sa.ucsb.edu.
 

Image
A screenshot of the Students Pending dashboard within the Alt. Time Requests section. The page shows a table listing a student in the course. Two orange arrows indicate the workflow for approving the request: the first points to a checkbox in the Action column, and the second points to the Mark Approved button, which is currently grayed out until the checkbox is selected.

(Visual Aide: An orange arrow points to an empty box labeled "Action". Another orange arrow points to a white button labeled "Mark Approved.")